Although we can use an array to implement a queue, we can not simply make the queue as a wrapper around an array-based list. We need to efficiently add items to one end of the queue and remove them from the other end. In an array-based list, adding or removing items at the front of the list takes \(O(n)\) time because all the other items have to be shifted over. So whether we call the front of the queue the start of the array or the end of the array, one of our two queue operations (enqueue or dequeue) will be inefficient.
To implement a queue with an array, we can use a technique called a circular buffer or ring buffer. In a circular buffer, we treat the array as if it wraps around from the end back to the beginning. We keep track of two indices: one for the front of the queue (start) and one for the back of the queue (end). The end index will always point to the position just past the last item in the queue (the location of the next item to be added).
Experiment with the animation below to see how we can efficiently add and remove items from a queue because we are maintaining a floating start and end index instead of trying to force the elements in use to always start from index 0.
A queue of integers that has the values 6 and 12. Start points at where the first value in the queue is stored, and end points just past the last value in the queue. Experiment with enqueueing and dequeueing items from the queue.
You can click and drag on the animation area to pan around. Use the Ctrl + mouse wheel (or touchpad scroll gesture) while over the animation area to zoom in and out.
When we create the queue, start and end will both be 0. Any time the two indices are equal, the queue will be considered empty. (If you did not try dequeuing all the items in the animation above, go try doing so now. Notice that “empty” is any time start and end match, not just when they are both 0.)
template <typename T>
class ArrayQueue {
private:
    T *list;            //array to hold the list elements
    int arraySize;      //capacity of array used for storage

    int start;          //index of the front of the queue
    int end;            //index of next available location at back
public:
    ArrayQueue() {
        arraySize = 8;
        list = new T[arraySize];
        start = 0;
        end = 0;
    }
    bool isEmpty() const {
        return start == end;
    }
};
If we keep adding and removing items, we will eventually reach the end of the array. To handle this, we use the circular buffer technique described above. Whenever we dequeue an item, we move the start index forward, and whenever we enqueue an item, we move the end index forward. If either index reaches the end of the array (it equals the arraySize), we wrap it around to 0.
The queue has had multiple items enqueued and dequeued. Enqueue two new values (type a value into the Value box and then press Enqueue) to see the end index wrap around to the beginning of the array. Then dequeue items to see the start index wrap around as well.
You can click and drag on the animation area to pan around. Use the Ctrl + mouse wheel (or touchpad scroll gesture) while over the animation area to zoom in and out.
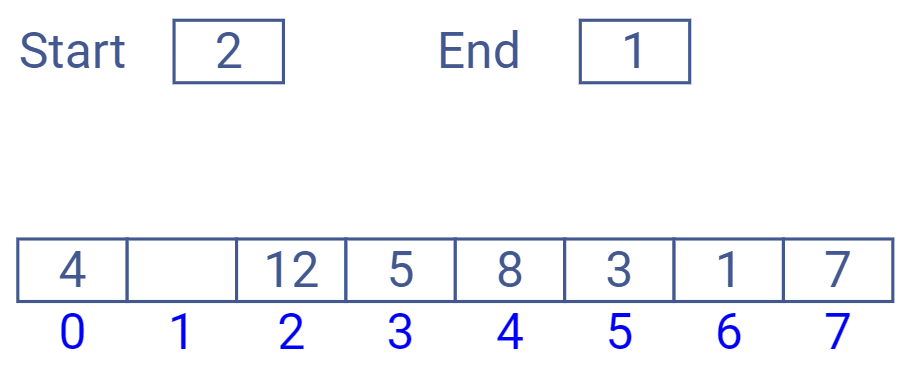
Defining empty as when start and end are equal means that we can only use arraySize - 1 elements of the array to store data. If we used all arraySize elements, then start and end would be equal when the queue was both full and empty, which would be a problem. So a “full” queue is when moving the end index forward by one (wrapping around if necessary) would make it equal to the start index. That could look like either of these two conditions:
Figure29.4.3.The queue is full because end is at the last position in the array. If we increase it by 1, it would wrap to 0 and be the same as the start index.
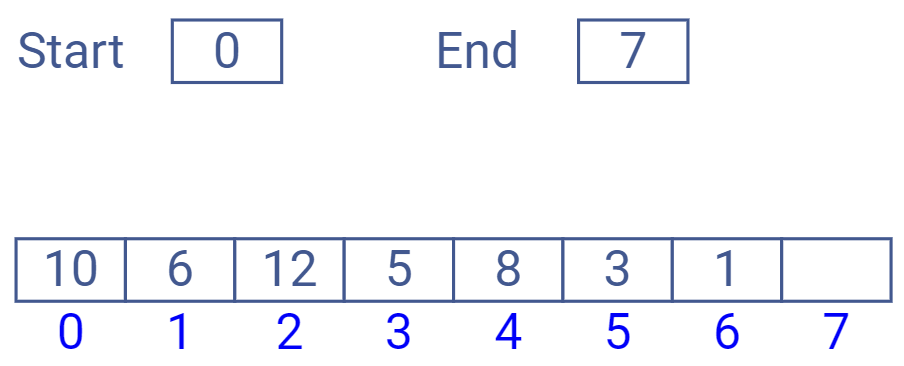
As with our array based stack, we can either use a fixed size array and limit the capacity of the queue, or we can implement grow() logic to allocate a larger array and copy the items over when we run out of space. If we do grow the storage, we can’t just copy the start and end indices as-is and move items from the old array to the new one in their same locations. If we did so, we might end up making the queue look like it contains a bunch of new (and uninitialized) items.
Figure29.4.4.A bad attempt at growing the array. In the new version, indexes 4 through 7 contain uninitialized data but count as part of the queue because they are between the start and end indices. We inadvertently added 4 elements.
Instead, when we grow the array, we should copy the items in the queue to the start of the new array. We can then reset the start index to 0 and set the end index to the number of items we copied over. This way, the queue will occupy a contiguous block at the start of the new array.
Figure29.4.5.A good attempt at growing the array. In the new version, the three items between start and end have been copied to the start of the new array. Then start and end indices have been reset to reflect the new positions of the items.