Section12.9Working with Versions: Branches and Checkout
You’ve successfully cloned the 1213-arraylist-example repository. When you clone a repository, Git typically checks out the default branch, which is usually named main. You should see main indicated as your current branch in the VSCode status bar (bottom-left).
Good news: For this specific project, the main branch has been set up to contain the **starter code** (the ADT interfaces, the test file, and a basic skeleton for ArrayList.java). This means after cloning, you are already on the correct branch to begin your implementation work!
However, you might wonder, "What if I want to experiment with a risky change later without messing up my main work?" or "How can I view the instructor’s solution for a specific step or the final version after I’m done?". Git handles these scenarios using a powerful feature called branches. Understanding branches, even at a basic level, is helpful for navigating the provided repository and is a fundamental concept in version control.
Think of a branch in Git as an independent line of development or a separate timeline within your project repository. Every repository starts with at least one branch (again, usually main). From any point in the project’s history, you can create a new branch to:
Analogy: Imagine you’re writing an important document (your main branch). If you want to try rewriting a whole section differently, you might "Save As..." to create a separate copy (`mydoc_rewrite_idea.docx`). You can work on the rewrite without changing the original. Later, you might copy ideas back, keep both versions, or discard the rewrite. Branches in Git are like this "Save As..." idea but much more integrated and powerful. Git manages the different timelines and makes it easy (though beyond our current scope) to compare them or merge changes between them.
For the 1213-arraylist-example repository that you cloned, branches are used to provide snapshots corresponding to different stages of the project, which you might want to look at later for reference or comparison:
Knowing how to switch between these branches allows you to view these different versions of the project code without affecting your own work on the main branch (as long as you’re careful about saving local changes, which we discuss next).
Subsection12.9.2Switching Branches (Checkout) in VSCode
The Git operation for switching your local project files to match the state of a different branch is called checkout. When you check out a branch, Git effectively rewrites the files in your working directory to match the snapshot stored on that branch.
Warning: Checking out a different branch will overwrite any unsaved or uncommitted changes in your current working files that differ between the branches. Since we are not covering Git commits in this introduction, the safest approach is:
Only check out other branches when you have saved your work on `main` and are okay with potentially needing to manually re-apply changes if you switch back.
Or, even safer, check out other branches *before* you start making significant changes to `ArrayList.java` on the `main` branch, just to see what they contain.
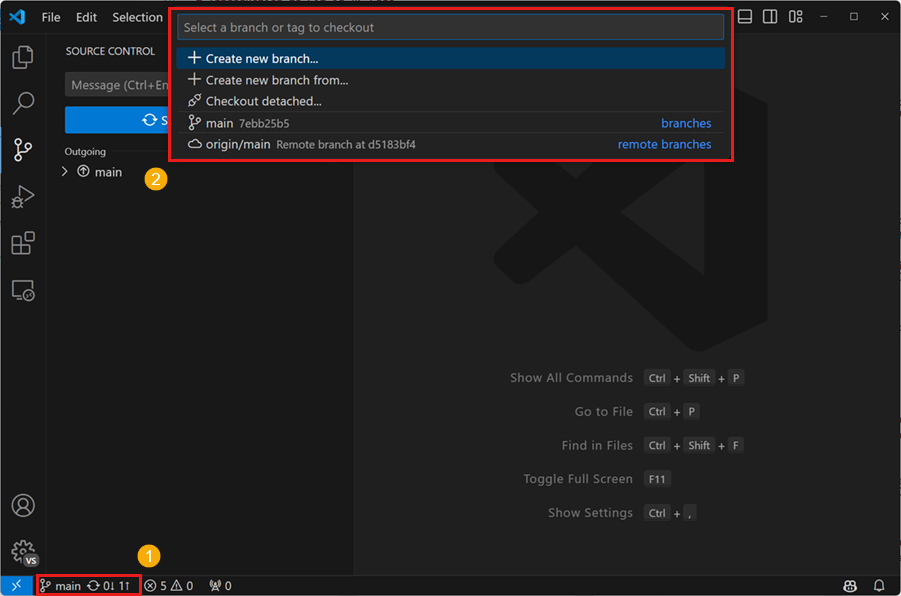
Switch (Checkout) Branch: A list of available branches will appear in the Command Palette area at the top. This list typically includes your local branches (like main) and remote branches prefixed with origin/ (like origin/main, origin/solution-final-refined, etc.). To view the state of a different branch, click on its name in the list (e.g., clicking origin/solution-final-refined will check out that specific version). VSCode will update the files in your editor and file explorer to match the selected branch.
Return to Main Branch: When you are finished viewing another branch, remember to switch back to the main branch to continue your implementation work. Use the same procedure: click the current branch name in the status bar and select main from the list.
Note12.9.3.Alternative: Command Line Checkout and Listing.
In the terminal, you can list only your local branches with git branch, or list all branches (including remote tracking ones, which show the state on GitHub) with git branch -a. To switch to (checkout) a branch, you use git checkout <branch-name>, for example:
# List all branches (local and remote-tracking)
git branch -a

# Switch to view the final solution branch (example name)
# Git might create a local tracking branch automatically
git checkout solution-final-refined

# Switch back to the main branch to continue your work
git checkout main
The VSCode interface handles the details more automatically and visually.
You now know that the main branch contains your starter code and is where you should work. You also know that other branches exist for reference and how to temporarily checkout them using VSCode to view their contents, remembering to switch back to main afterwards. Next, we’ll briefly touch on other ways VSCode helps when working with Git before concluding this introduction.