
Section 12.11 Week 10 Lab

Note 12.11.1. Material Covered - CodeSkulptor.

GUI control objects, Event handling
  • This lab requires the use of CodeSkulptor.
  • You must show your code to the instructor to get checked off for each of the three levels.
  • Make sure to comment your code and remove all hard-coding of values.
  • Use CodeSkulptor’s documentation when you are stuck or having troubles with syntax!
  • Remember that if you modify the value of a global variable within the local scope of a function, you need to include global variable_name within that function. Otherwise, your program might run but not work as intended.
  • Make sure to save your work frequently in a .py file in case your web browser closes or gets refreshed. To do this, press the ’Save’ button then the ’Download’ button on the Codeskulptor 3 main web page.

Subsection 12.11.1 Level 1 - Create a stopwatch

In this level you will be creating a stopwatch using CodeSkulptor 3.
  1. Start with the default CodeSkulptor 3 script.
  2. Remove the message variable and add two global variables; one to hold the time and one to hold the increment value (how fast the timer changes). Set both of these to 0 initially.
  3. Create a start function that will set the increment variable to 0.005.

    Note 12.11.2.

    Add the ’global variable_name’ statement to the top of this function (and the other functions discussed below) in order to be able to update this global variable.
  4. Create a stop function that will set the increment to 0. Create a reset function that will set the time to 0 and the increment to 0.
  5. Create buttons that link to the three functions from step 2 and step 3.
  6. Edit the draw function so that it will draw the time variable on the canvas. Use the round() function so your time variable only prints to 2 decimal places. In addition to displaying the time, you will also need to update the time in draw, using the increment variable.
  7. Test to make sure your stopwatch is working.
  8. Show your instructor to get credit for Level 1.
Below is an example of a stopwatch. Yours should look similar.

Subsection 12.11.2 Level 2 - Part one of target shooting game

In this level, you will be creating part one of a target shooting game using CodeSkulptor 3.
  1. Start with the default CodeSkulptor 3 script.
  2. Import the random and math modules.
  3. Create 3 global variables:
    • one string that says "hit start"
    • one boolean for whether the game is running, set to false
    • one list to hold the target’s current location (stored as a 2 item list of x and y coordinates). Assign its initial value to 250,150 (the center of the canvas) for now.
  4. Edit the frame to be 500 by 300.
  5. Add a button called start. Define the start button handler function. In the handler you should just set the global boolean to true to start the game.

    Note 12.11.3.

    Remember that in order to change a global variable inside a function, you need to add ’global variable_name’ at the top of the function.
  6. Edit the draw() handler function. If the global boolean is true then do the following:

    Note 12.11.4.

    Look at the Docs->Graphics Modules->Canvas->Draw Circle examples to see how to write the lines of code below.
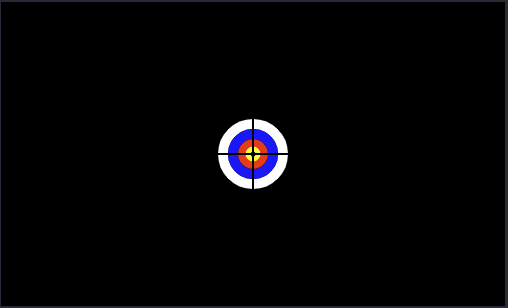
  • Draw four circles using the global list variable for coordinates, a line width of 1, a line colour of black, and various fill colours, as shown below. The largest circle should have a radius of 30, the other circles should have radii of 22, 15 and 8.
  • Next, draw two lines (look at the same documentation, but the section on drawing a line segment). The lines should intersect the circle centers horizontally and vertically.
  • Lastly, at the bottom of your program, add the frame.set_draw_handler() and frame.start() commands. When you run this, the canvas should look like the image (below) after the start button is pressed.
If the global boolean is false, your code should just display the start message that tells the user to click the start button.

Subsection 12.11.3 Level 3 - Complete target shooting game

This level builds upon the code from level 2.
Make sure your code from level 2 works as instructed before proceeding with this level!
  1. Create two global integer variables, one to increment the x direction of the target and one to increment the y direction (assign them number values between 0 and 5).
  2. Inside the conditional in the draw() function, after you draw the target, add code to increment the target’s x and y coordinates stored in the coordinate list.

    Note 12.11.5.

    Because you are editing elements of a list, you don’t need to use the global keyword. If you run this code now, the target should move off the screen and disappear.
  3. Now we need to make sure the target stays on the canvas. Add if statements that check if the target’s x or y coordinate has gone outside the canvas width or height.

    Note 12.11.6.

    Unlike the canvas of the turtle module, the position (0,0) is at the top left of the screen, not the center.
    Follow the sub-steps below for this part.
    • Write an if statement that checks whether the current x coordinate is less than the radius of the target OR greater than the width of the window minus the radius. If either of these conditions is true, reverse the direction of the x increment variable by multiplying it by -1.

      Note 12.11.7.

      This means that if you were previous adding 3 to the x coordinate each time the draw function was called, now you will be adding -3, so that it goes in the other direction. Note that we use the radius in these conditions (for both sub-steps) because the coordinates specify the center of the target and we need to make sure that the whole target stays on screen. Remember that the increment variable is global, so you will need to explicitly allow edits to this global variable inside the draw function.
    • Repeat the above sub-step for the y coordinate, checking to see if the current y is less than the radius or greater than the height of the window minus the radius. If either condition is true, multiply the y increment variable by -1.
    • Run your code now, the target should move around the screen, bouncing off the edges of the canvas.
  4. Create a mouseclick() handler and define its function (see Docs->Graphics Modules->Control Objects ->Mouse input handler).
  5. We want to check if the mouse has clicked on the target. To do this, you need to check if the x click location is between target_x - radius and target_x + radius, and if the y click location is between target_y - radius and target_y + radius. If so, change the global boolean flag so the game stops and print out a winning message.

    Note 12.11.8.

    The x, y coordinates of the mouse click are passed into the mouse handler function as a tuple with two items, so you will need to get those coordinates in the same way that you accessed the target’s x and y coordinates.
  6. Show your instructor to get credit for Level 2 and Level 3.
Below is a video of a similar program that prints a message to the console based on the position of a mouse click. You are NOT required to include these changes.
You have attempted of activities on this page.