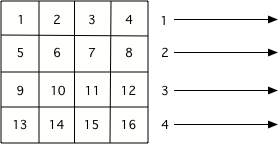
When we loop through the pixels in an image, our loop moves from left to right across each row starting from the top one and working our way to the bottom.
Figure21.6.1.The order that pixels are processed if you use img.getPixels(). First, we visit the top row moving from left to right. Then we go to the second row and move from left to right again. The process continues until we reach the bottom of the image.
Sometimes, we don’t care where a particular pixel is in the image. But if we want to accomplish a goal like “Make the bottom half of the image black”, we need to know if the current pixel is in the bottom half or not.
To find out where a pixel is, we can use the .getX() and .getY() functions of the pixel object. This code sample shows using the two functions to ask for the x and y locations of each pixel.
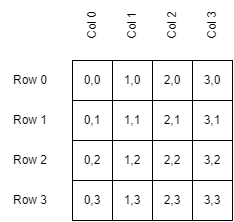
If you examine the output, you should see that the first pixel is at x = 0, y = 0. Then we move to x = 1, y = 0. The next pixel is at x = 2, y = 0. A few important details to notice:
We start counting from 0 for both x and y. The leftmost pixel is at x = 0. The pixel to its right is at x = 1.
Now let’s put the pixel coordinates to work. We are going to use the location of each pixel to modify its color. We will do so by subtracting its x coordinate from each of the color values (red, green, blue). This means on the left side of the image, where x is 0 or close to it, there is little change. On the right side, where x is larger, we remove more and more of the color, getting closer and closer to pure black. (Once we hit column 255, we could only get black as the starting red/green/blue values are all 255 at most.)
We don’t always have to modify the pixel color. We can also use the coordinates to move a particular pixel to a new location. This sample calculates a newY that is used as the y coordinate for the pixel when we put it back in the image. This newY is calculated as the height of the image minus one minus the y location of where we got the pixel. Then instead of updating the pixel in its old location, we use setPixel to copy it to the new location.